Wednesday, November 29, 2017

Quilling Art Blogs for Quilling Lovers - Artyulia by Yulia Brodskaya

Yulia Brodskaya's Website Screenshot
I learned about Yulia Brodskaya from a CNN article. The details of the report can be found on the link below.
How did she make that from paper?
She is an artist and illustrator known for her handmade elegant and detailed paper illustrations.

After reading the CNN report, I entered the website of Yulia Brodskaya and the website design was simple and elegant. However, after reading her works, you will instantly have a very admirable feeling, there will definitely be wow wow feeling.

Her work is so beautiful. Every work is very lifelike. There is a pleasing feeling of watching her work.

Her main work is classified as PaperGraphic, TypoGraphic, Fine Art, and I take a few screenshots from her website, let's take a peek at her works.

Yulia Brodskaya's PaperGraphic:

Tuesday, November 28, 2017

Quilling Art Blogs for Quilling Lovers - The Papery Craftery Blog by Meredith

The Papery Craftery Blog by Meredith

About Meredith:

Meredith, art school grad and mama of two awesome and incredibly energetic littles. She fell across paper quilling by chance and fell in love with all the amazing things paper can do!

About The Papery Craftery Blog:

The blog started in 2015, the main contents are to share quilling tutorial, include videos, text, and printables. Meredith is very professional and serious, her tutorials are very detailed and understandable, even beginners also can make the projects following her post steps.

Monday, November 27, 2017

Quilling Art Blogs for Quilling Lovers - Ayani art blog by Otilia

The Screenshot of Otilia's Ayani art blog
Otilia started this blog in 2012, her main works include 3D Quilling, Quilling Cards, Quilling Flowers, Quilling Jewelry, Quilled photo frames etc.

Her works are very atmospheric, giving a beautiful enjoyment. And also I think she must be a good photographer too. 

Here are two works by Otilia:

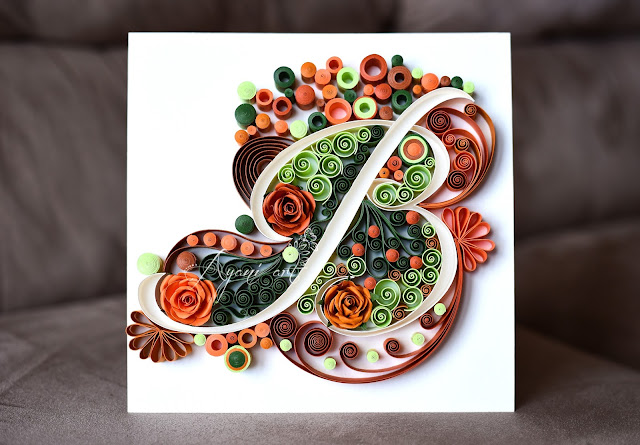
1. Quilling B Letter - Ayani art blog by Otilia

Quilling B Letter - Ayani art blog by Otilia

2. Purple Paper Roses and Quilling - Ayani art blog by Otilia

Purple Paper Roses and Quilling - Ayani art blog by Otilia
Do you think they are beautiful and wanna to make some quilling projects like these? Learn more about Otilia and her blog:
Popular Posts on Otilia's Ayani art blog:
More Quilling Artist Blogs Here:

How to Make Quilling Basic Shapes - Tight Coil

Tight Coil

Tight Coil: Often use in the central of the quilling projects or fix other "parts". 


You need to prepare for making tight coil:

  1. Glue
  2. Quilling Slotted Tools
  3. Quilling Paper Strips
Note: You can buy these kits and tools from Lantee Quilling Store >>

How to make Tight Coil Step by Step:

  1. Hold the paper strip in one hand and the quilling tool in the other. Insert the edge of the paper into the slot and begin rolling the coil by spinning the quilling tool. 
  2. After you’ve rolled the paper halfway, add another strip of paper and continue rolling. 
  3. After you’ve rolled a few more inches of paper, add the third strip of paper. 
  4. When you reach the end of the paper strip, add glue to secure the end and hold until the glue is dry. (If you squeeze too much glue on the paper, simply spread it across the barrel of the coil. Your fingers will get sticky so you can wipe your fingers off with a damp towel or baby wipes.) 
  5. Remove the coil from quilling tool. Be careful that the coil’s center doesn’t come out when you remove it from the tool. Hold the center of the coil with your fingernail as you slide it off the tool. 

Note: You can also use this method to make even larger discs. If you are rolling several strips of paper into one coil, you may want to glue the strips together as you add them. 

Your first tight coil is finished! Make more for your favorite project.


These quilling projects have used Tight Coil:


Also, you can find how to make quilling tight coil on Youtube:

Saturday, November 25, 2017

3D Quilling Christmas Santa - Learn How to Make Cutest Quilled Santa Claus

3D Quilling Santa Claus
3D Quilling-Santa Claus

Do you ever wanna to quill a 3D Santa Claus? 
The material will be used:
  • Red quilling strips to make body and arms.
  • White quilling strips to make cap, arms, and bears.
  • Black quilling strips to make the belt of Santa.
  • Brown quilling strips to make legs and belt sign.
  • Naked quilling strips to make face and hands.
  • Fake eyes for toys to make Santa's eyes.
Quilling Strips Recommend to you:

The Quilling Tools will be used:
Buy quilling tools and quilling strips, please go to Lantee Quilling Store >>

The steps:

1. Body: Make 2 large tight coils, and stick together as the body of the Santa.

Stick 2 large tight coils together to make Santa's body

2. Arms: Make 2 small tight coils as the arms of Santa.


3. Cap: Make a tight coil as the hat of Santa


4. Face: Make a naked color tight coil as the face of Santa


5. Beard: Make 2 small teardrops and cut a white strip as the mustache and beard of Santa


6. Legs: 6 Tight Coils to make legs


7. Hands: 2 eyes shape to be as the hands of Santa.


8. Belt: Using Hand-operated quilling crimper to make a black belt and stick onto the body.


9. Stick all the parts together.


Learn more how to make this Cutest Quilled Santa Claus, please watch the video:

Tuesday, November 14, 2017

Quilling Videos from Youtube 3 - How To Make Beautiful Flower Using Paper Art Quilling


Quilling Flowers
If you wanna to learn how to make beautiful quilling flowers like the image above, this video will be your choice.

1. The component of these quilling flowers:
  • - 1 tight coil is as the center of the flower.
  • - 5 teardrop similar shapes are as the petal around the tight coil.
  • - Teardrop similar shape is wrapped in another color quilling strip.


2. Quilling Tools will be used to make the quilling flowers:


Watch the video by Kunali Shah and learn how to make the quilling flower step by step.


Wednesday, November 8, 2017

Quilling Videos from Youtube 2 - Christmas Ornament - Quilling Snowflakes


This quilling snowflake is composed of:

  • 7 White tight coils, one is in the center, the other six is on the top of six blue teardrops.
  • 6 Blue tight coils, tightly around the white center tight coil.
  • 6 White Eye Shapes, stuck between the 6 blue tight coils.
  • 6 blue teardrop, glue with the 6 blue tight coils.


Tools will need to make this snowflake:


Watch the video to make the quilling snowflake step by step:


Quilling Videos from Youtube 1 - How to Make Quilling Snowflakes


Do you want to make a quilling snowflake like this? This Youtube video will show you how to make a quilling snowflake like this step by step.

Tools You will need


Watch the video to make this snowflake step by step:


Video Link: https://www.youtube.com/watch?v=gKw-8rUB8a0


Monday, November 6, 2017

Quilling Art Blogs for Quilling Lovers - Ada's Quilling by Ada

Ada's Quilling by Ada


Ada's blog started in 2011, have about 7 years and 400 articles. Her works include quilling flowers, greeting card, quilling about holiday, wedding etc.

Her recently works:


Brief introduce of Ada:
Ada found Quilling in September 2011 and has since become a hobby that she can not break. Until now, the evolution for her was like a ladder that had to climb step by step, through hard, hard work and especially patience.
Learn more about Ada and Ada's works here:

Ada's Blog
Ada's Facebook
Ada's Pinterest
Ada's Instagram